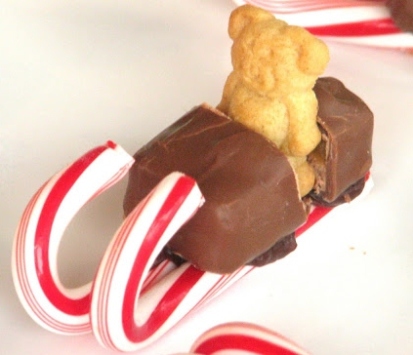
- 1st …..spread a small amount of chocolate frosting on two mini candy canes.
- Then …..cut the miniature candy bar in 1/2
- Add your miniature candy bar and put a little teddy graham in between.
-
Let it sit overnight
Archive for the ‘Home’ Category
Teddy Bear on a Sled
Posted: October 29, 2012 in Christmas, Cooking, Crafts, Daycare, Food, Holiday, Home, PartyTags: bear, Candy, Chocolate, Christmas, Holiday, Kids, Sweets, teddy bear, Treats
0

Kankakee: Police release names in Buckner killing – The Daily-Journal
Posted: January 14, 2012 in Home, Life, PersonalTags: Joe, Kankakee, Killed, My brother
Kankakee: Local grassroots group meets tonight to carry on ‘Joe Buck’s’ legacy – The Daily-Journal
Posted: January 14, 2012 in Home, Life, Personal, While OutTags: Joe, Joe Buck, Killed, My brother
Sorry I Have Not Been On
Posted: January 14, 2012 in Cooking, Holiday, Home, Life, Me talking about people, My Thoughts, Parenting, Personal, Relationship, While Out, workIt has been a while
I miss ya’ll.
It started out with me just being too busy to come and post. Between home life, dealing with my hubby,my kid, the kids sports, the kids school events, my school, and work I just had no time.
Then, (deep sigh) I had a death in my family. My oldest brother got killed 😦 D=, it happened the day after my 30th birthday on black Friday, which was the day before his daughter 11th birthday...SIGH .. So, November and December were not my months.
So, I have been pretty busy. I am apologizing, I have a lot of great post just like my old page..
Be Blessed Edna Moore-Washington

I posted a few weeks back about the dip tray I made… Well through emails I learned you guys want a step by step guide to making it…
History of my $3.oo tray
Bored day, went to Dollar Tree got a plate and a bowl and was on my way home to make a dip tray…
So I washed it…. didn’t take a picture because EVERYONE knows how to do that. I dried it and it was another step that I know everyone can do without a picture.
So I added the glue to the candle stick… The glue is mixed with orange paint so I can mark my spot… I simply put glue on the the bottom of the candle stick holder….

I put it on the plate so I can mark it…. Once I marked it

Once I marked it I applied more glue to it and placed it all together. I used a lot of glue …Let it sit for 2 minutes so it could get sticky/ tacky…
 Put it on the center of the plate.held it down . Added glue to the top of the candle stick..Let it sit for 2 minutes so it can get sticky/tacky like we did to the bottom 3 minutes prior. Put the bowl on top and hold it down

all you need to make this
- 1 plate
- 1 bowl
- 1 candle stick holder
- or vase
- E-6000 glue
PLEASE LET IT SIT… I RAN OUTSIDE TO SHOW MY HUSBAND….
BAMMMMMMMMMMMMMMMM

IT DROPPED AND I HAD TO REDO IT… LOL

- Coffee Pot and Tea Pot Stains – Take an equal amount of water & vinegar let it sit in the pot for 30 minutes… or more depending on the stain. Rinse good when you done
- Furniture Polish Booster — Simply add a few drops to the polish you have now and instant boost
- Brass 7 Copper Cleaner – Take an equal amount of Lemon juice and vinegar …Apply Carefully just glazing the item with the material. Let stand 5-7 minutes. Take a fluff-free cloth and polish off
- Tile & Other Heavy Duty Surfaces –Wet a cloth with lukewarm water, wring it out. Add some vinegar to the cloth. Apply to the surface. Let dry. Buff it with a clean fluff-free cloth
- Stainless Steel Pans (and other utensils) using bicarbonate of soda and a towel moistened with vinegar
- Window Cleaner- Pint of warm water 2 teaspoons of vinegar and mix
- Marble, Tiles and Paintwork Cleaner – ½ a pint of paraffin mixed with a ½ pint of vinegar. This mixture can also cleans most (not all) types of furniture.
- Dust (small metal objects like bolts) place object in vinegar until the residue dissolves
- Whitewash and Distemper Splashes – wipe off with vinegar
- Steam Iron Mineral Deposits — take an equal amount of vinegar and water, let it steam out
- Removal of stickers and gooey residue — Soak the item in vinegar till the pieces float apart. Be careful what you apply the vinegar on, some things can have vinegar sitting on it for longer than others
- Winter Salt From Shoes – Wipe the shoes off with a wrong out towel in a mixture of equal water and vinegar
Laundry
- Ring around the Collar (and Cuffs) – take an equal amount of baking soda and vinegar. Make it a thick paste. Take a toothbrush (old toothbrush) scrub it onto the stain. Leave for an hour and wash it like you normally do
- Face Towel, Dish Towels get slimy, smelly and sour — soak in vinegar and water overnight. Rinse out in clean water in the morning and wash the cloths normally
- Ink stains—soak in vinegar for an hour and then wash.
- Maintain the colors on stripes cloths— Wash in Warm water, add 1 cup of vinegar and use the same amount of detergent you normally would.
- Whitewash and Distemper Splashes in cloths – soak an hour vinegar then wash normally
- Fabric Softener– mix 2 cups bicarbonate of soda, 2 cups vinegar, and 4 cups water and a quarter cupful to your final rinse
- Scorched Laundry Boil Juice from lemon, 2 ounces of Fullers Earth, 1 Cup of Vinegar, ½ ounce of soap …Spread over scorched article …Leave to Dry. After it has dried wash as normal.
While at the dollar store I decided to get crafty
I got a plate and a bowl
and was on my way home to make a dip tray…
all you need to make this
- 1 plate
- 1 bowl
- 1 candle stick holder
- or vase
- E-6000 glue
I simply glued the bottom of the candle stick holder…. I used a lot of glue …Let it sit for 2 minutes so it could get sticky/ tacky… Put it on the center of the plate.held it down . Added glue to the top of the candle stick..Let it sit for 2 minutes so it can get sticky/tacky like we did to the bottom 3 minutes prior. Put the bowl on top and hold it down
PLEASE LET IT SIT… I RAN OUTSIDE TO SHOW MY HUSBAND….
BAMMMMMMMMMMMMMMMM
IT DROPPED AND I HAD TO REDO IT… LOL
Use the thing that keeps the bread tied together to label your cords….

21 DAY ORGANIZING CHALLENGE
Join the Challenge (at any time)
Day 1 – Junk Drawer
Day 2 – Computer Desk
Day 3 – Tupperware Cabinet
Day 4 – Linen Closet
Day 5 – Under kitchen sink
Day 6 – Dresser Drawers
Day 7 – The Pantry
Day 8 – Coat Closet
Day9 – Toy organization
Day 10 – Laundry Room
Day 11 – The Freezer
Day 12 – Spice Cabinet
Day 13 – Medicine Cabinet
Day 14 – Under bathroom sink
Day 15 – Medicine/Vitamin Storage
Day 16 – The Fridge
Day 17 – The Mail
Day 18 – Keepsakes
Day 19 – Master Closet
Day 20 – Photos
Day 21 – You pick!
Summer Road Trip #1: Car Snacks
3 easy snacks for the road or camp ground.
1) Empty peanut butter jar + celery sicks
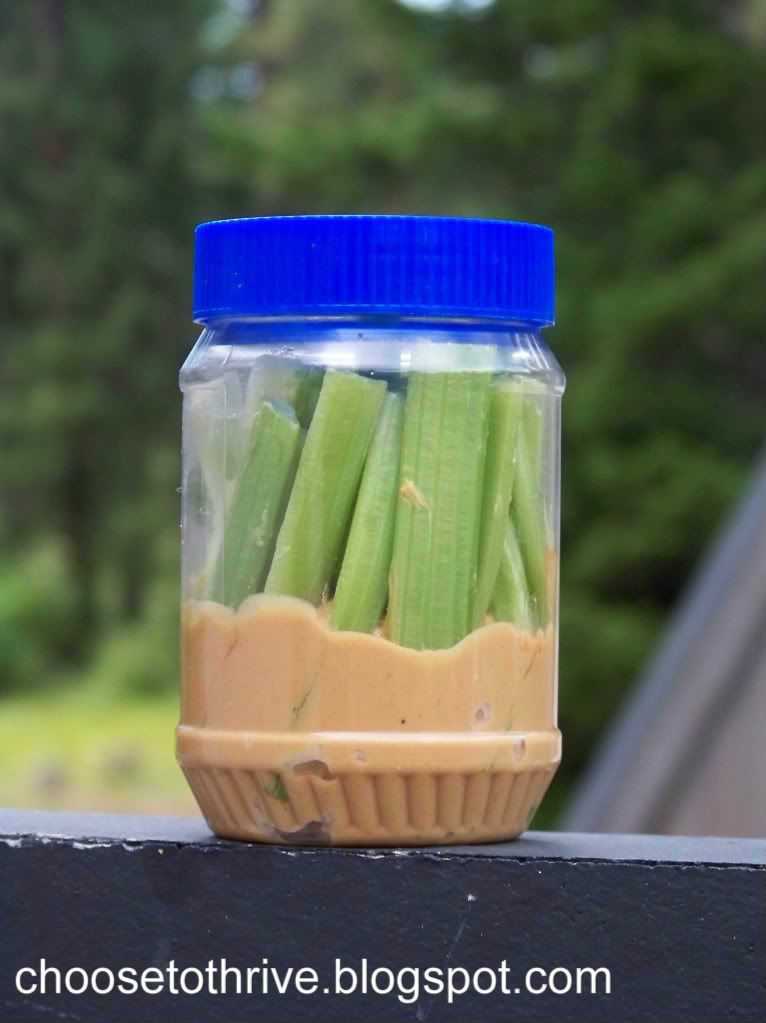
Finally a way to have p.b. and celery without the mess. Fill an empty jar with an inch or two of peanut butter and then fill with celery sticks. Kids get a yummy snack without sticky fingers and the car stays free of kid schmeer.
2) Empty sour cream container + empty baby food ja
A quick way to pull off carrots and dressing without the dragging the jar along or buying those expensive to-go dressing singles.
3) Empty 32 oz. yogurt container + single serving yoplait
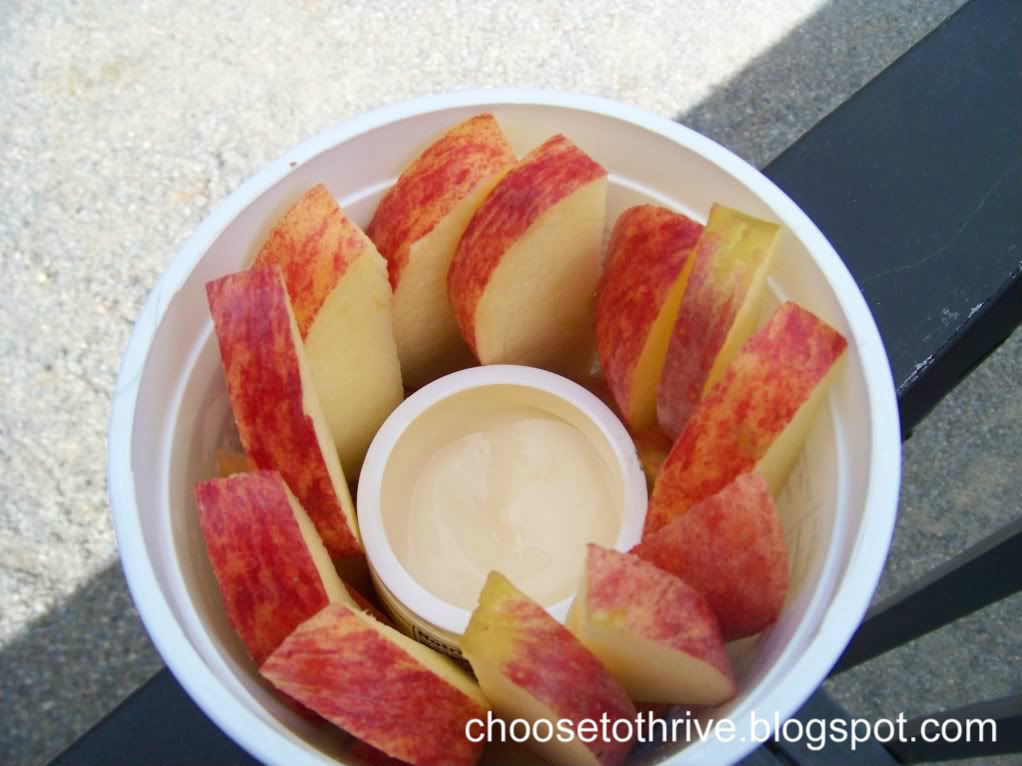
Easy peasy fruit slices and dip. So yummy straight from the cooler at a camp site or rest stop.
Delish.
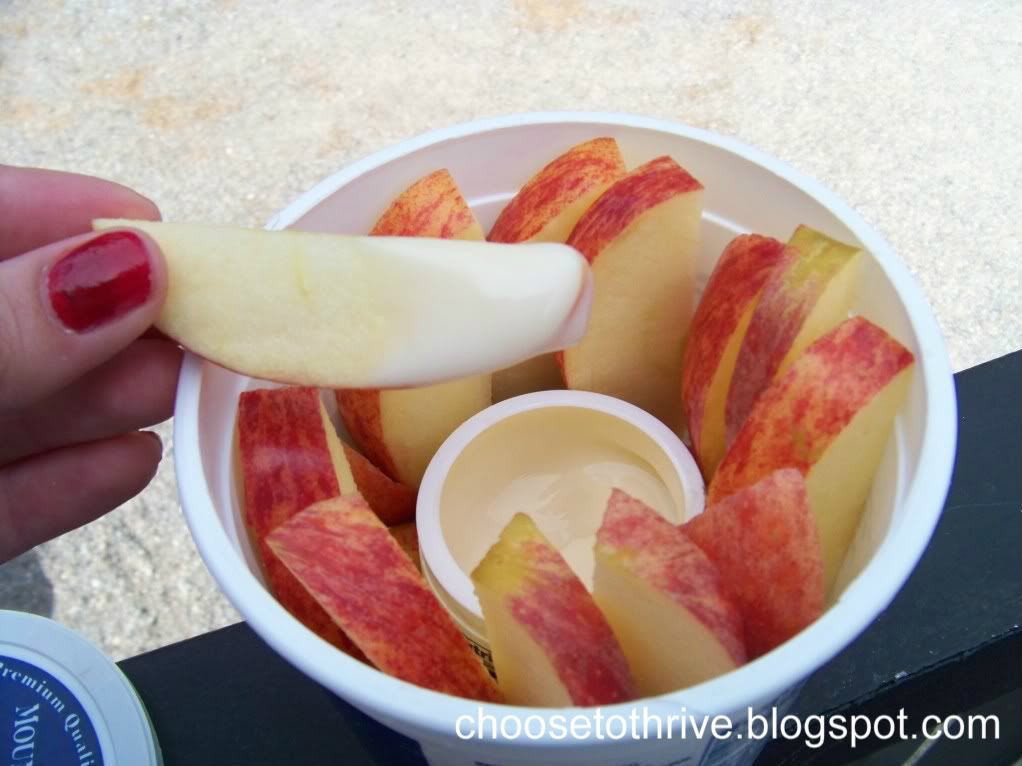
So there you go–easy straight-from-the-recycling-bin solutions for eating well on the road.
